Search Results
600 results found with an empty search
- Nussmakronen – Swiss-Inspired Recipes & Photography | Poetic Road
Chewy, nutty cookies with a crisp exterior and a rich chocolate-dipped base, inspired by Swiss and German holiday traditions.| From Poetic Road by Christine Loertscher – Swiss-inspired recipes and photography. < Back Nussmakronen Prep Time: 15 minutes Cook Time: 12 minutes Serves: 12-18 Cookies Oct 23, 2025 Last updated: This recipe may contain affiliate links About the Recipe These Chocolate-Dipped Nussmakronen (pronounced noos-mah-kroh-nen) are a newer addition to our Christmas cookie box, but they’ve quickly become a favorite. They bring that cozy, nutty vibe you expect from a classic European holiday cookie, with a little chocolate twist for extra indulgence. Inspired by both Swiss and German baking traditions, they’re surprisingly simple to make—but they look (and taste) like you picked them up from a fancy bakery. If you’ve already made Vanillekipferl or those spiced Cinnamon Stars , these fit right in. And if you’re into almond-forward cookies like my Honey Nut Macarons , you’ll love the chewy center and crisp outer shell of these Nussmakronen. The chocolate-dipped base just seals the deal. They’re perfect with a cup of something warm or wrapped up as part of a cookie box to share. However you serve them, they’re guaranteed to add a little extra joy to your holiday season. SKIP TO RECIPE CARD SKIP TO VIDEO Simple and Festive: With just a handful of ingredients, these cookies come together quickly, yet they look elegant and taste amazing, perfect for holiday gatherings or gift boxes. Rich Nutty Flavor: Ground hazelnuts (or almonds) give these cookies a deep, warm flavor, with a chewy texture that’s truly comforting. Decadent Chocolate Finish: Dipping the bottoms in chocolate adds a hint of indulgence and pairs beautifully with the nutty cookie, making each bite extra special. Swiss-German Influence: Inspired by European traditions, these cookies offer a taste of classic Swiss and German holiday baking, adding something unique to your dessert spread. What You'll Love 1. Can I use almonds instead of hazelnuts? Yes! Almonds work beautifully in this recipe and give a milder, slightly sweeter flavor. You could even try a mix of both hazelnuts and almonds if you like. 2. How should I store these cookies? Store your Nussmakronen in an airtight container at room temperature for up to one week. They also freeze well if you want to make them in advance; just thaw them at room temperature before serving. 3. Can I use chocolate chips instead of a chocolate bar for dipping? Yes, chocolate chips will work for dipping. Just be sure to melt them gently and stir in a teaspoon of neutral oil (like vegetable oil) to keep the chocolate smooth and glossy. 4. Why are my Nussmakronen too flat? If your cookies are spreading too much, the egg whites might not have been whipped enough, or the batter might be too warm. Try chilling the batter for about 10-15 minutes before piping. 5. How much chocolate should I dip with? For dipping, around 100-150 grams (3.5-5 oz) of chocolate should be enough. You can always melt more if needed, but this amount should give each cookie a good coating on the bottom. Frequently asked Questions Ingredints Explained Ingredients 2 large egg whites 150g (3/4 cup) granulated sugar 200g (2 cups) ground hazelnuts or almonds 1/2 tsp vanilla extract (optional) 1/4 tsp ground cinnamon (optional) 100-150 grams (3.5-5 ounces) of chocolate (melted) (optional) Whole hazelnuts for decoration NEWSLETTER SIGN-UP Preparation Preheat Oven: Preheat your oven to 320°F (160°C) and line a baking sheet with parchment paper. Beat Egg Whites: In a clean, dry bowl, beat the egg whites until stiff peaks form. Add Sugar: Gradually add the sugar, beating continuously until the mixture is glossy and holds stiff peaks. Fold in Nuts and Flavorings: Gently fold in the ground nuts, vanilla extract, and cinnamon until just combined. Be careful not to deflate the egg whites too much. Pipe the “Donuts”: Spoon the mixture into a piping bag fitted with a large round tip (or cut a large opening in the bag). Pipe small donut-shaped rings onto the prepared baking sheet. Decorate with Hazelnuts: Place a whole hazelnut into the center of each cookie before baking. Bake: Bake in the preheated oven for 12-15 minutes, until the cookies are set and lightly golden. Remove from the oven and allow them to cool on the baking sheet. Add the Chocolate (optional): While the cookies are cooling, melt chocolate . Once the cookies are cool, spread melted chocolate onto the buttom of each cookie (or drizzle it ontop. Or both) Set and Serve: Let the chocolate set completely before serving. Enjoy! If you enjoy these you might also enjoy: Cinnamon Stars (Zimtsterne) Spitzbuebe Honey Nut Macarons Recipe Card Chef's Notes Storage Tips Recipe Card RECIPE VIDEO Newsletter SignUP
- Bruschetta with Garlic Confit and Herb Vinaigrette – Swiss-Inspired Recipes & Photography | Poetic Road
This deconstructed version of bruschetta is simple to make and explodes with flavor.| From Poetic Road by Christine Loertscher – Swiss-inspired recipes and photography. < Back Bruschetta with Garlic Confit and Herb Vinaigrette Prep Time: 25 minutes Cook Time: 45 minutes Serves: 12-15 Servings Oct 14, 2025 Last updated: This recipe may contain affiliate links About the Recipe Bruschetta has always been one of my favorites—it’s simple, packed with flavor, and works as a light meal, appetizer, or even a quick snack. I still remember the first time I had it back in elementary school when a classmate brought some for lunch (lucky her—my lunches were never that exciting). I loved it so much I asked her for the recipe, and it’s been in my recipe book ever since. After weeks of holiday baking and way too many cookies, I needed a break from all the sugar. That’s when I thought of bruschetta. The festive red and green colors felt perfect for Christmas, and it had been a while since I made it. But instead of sticking to my childhood recipe, I decided to mix things up with a fun twist: a deconstructed version with confit garlic and a herby vinaigrette. The confit garlic is a game-changer—it’s sweet, mellow, and almost like garlic candy, without that harsh bite. And the herby vinaigrette? So good. It ties everything together and can double as a salad dressing or a drizzle over steak or grilled veggies. Honestly, it’s a flavor booster you’ll want to use everywhere. This version of bruschetta has it all—fresh, juicy tomatoes, crispy bread, and plenty of rich, bold flavors. I hope you give it a try and love it as much as I do! SKIP TO RECIPE CARD SKIP TO VIDEO A Twist on the Classic: The confit garlic and herby vinaigrette give this bruschetta a fun and flavorful upgrade. Versatile Vinaigrette: Drizzle it on the bruschetta or use it on salads, steak, or roasted veggies. Make-Ahead Friendly: Prep the garlic and tomato mix ahead of time, so it’s ready when you need it. The Perfect Balance: Crispy bread, juicy tomatoes, and sweet, caramelized garlic come together for an irresistible bite. Holiday-Friendly: The festive red and green make it a great addition to any holiday spread! What You'll Love Can I make the confit garlic ahead of time? Absolutely! You can make it a few days in advance and store it in a jar with olive oil in the fridge. Just bring it to room temperature before using. What kind of bread is best for bruschetta? A good crusty baguette or sourdough is perfect. You want something that crisps up nicely but holds the toppings without getting soggy. Can I use cherry tomatoes instead of regular ones? Of course! Cherry or grape tomatoes are great—they’re sweet and bite-sized, making them super easy to prep. How do I store leftovers? Store the tomato mixture, confit garlic, and vinaigrette separately in airtight containers in the fridge. Assemble fresh when you’re ready to enjoy more. Frequently asked Questions Ingredints Explained Ingredients 1-2 cups Garlic Confit 2 cups Tomatoes (finely chopped) 1 cup Parsley 1 cup Basil 1/4 cup Oregano 4 Tablespoons Extra Virgin Olive Oil (plus a bit extra for drizzle) 4 Tablespoons Red Wine Vinegar 1/2 Teaspoon Salt Pepper to taste 1 Baguette NEWSLETTER SIGN-UP Preparation Start by making your garlic confit . You can press the link to go to the recipe, but you basically just need to peel a whole bunch of garlic, submerge it in olive oil, add some herbs (in this case I added fresh rosemary sprigs) and shove it in the oven at 325F for about 45 minutes . Meanwhile prep your tomatoes. Chop them into small cubes. I find the smaller the better, as they tend to pile onto the baguette a little easier. Add the chopped tomatoes to a medium bowl with a tablespoon of olive oil and some salt and pepper to taste. Stir well. Once your garlic is golden, ready and out of the oven, you can prep your little baguette toasts. Cut your baguette at an angle into 2cm thick slices. Line them onto a baking tray, drizzle with a bit of olive oil and a sprinkle of salt and pop them into the oven at 350F and toast for 25 minutes or until golden and crispy. Meanwhile prep your herb vinaigrette. Add the parsley, basil, and oregano to a food processor with the 4 tablespoons of olive oil and red wine vinegar. Season with salt and pepper to taste. Blend until you have a nice smooth green drizzle. To plate, take a piece of toasted baguette and with a knife spread a clove of the garlic confit over top. Top the garlic with a spoonful of tomatoes and a nice drizzle of the herby vinaigrette. Complete with a sprinkle of salt and enjoy! You'll want to make a whole bunch of these, especially if you are hosting. I guarantee they will be a hit, so make sure to prep some extra! Recipe Card Chef's Notes Storage Tips Recipe Card RECIPE VIDEO Newsletter SignUP
- Swiss Chocolate Ring Cookies with Lemon Glaze – Swiss-Inspired Recipes & Photography | Poetic Road
Tender Swiss chocolate ring cookies with a rich, balanced chocolate flavor and a light lemon glaze that adds just the right contrast.| From Poetic Road by Christine Loertscher – Swiss-inspired recipes and photography. < Back Swiss Chocolate Ring Cookies with Lemon Glaze Prep Time: 30 minutes Cook Time: 7 minutes Serves: 48 Cookies Dec 20, 2025 Last updated: This recipe may contain affiliate links About the Recipe In Switzerland, Christmas wouldn’t be Christmas without a table full of cookies. Most families bake a generous assortment - often ten or more - using recipes that are made year after year and shared across generations. Classics like Zimtsterne , Spitzbuebe , and Schoggi Herzli are always part of the mix, each one simple, familiar, and meant to be enjoyed slowly. These chocolate rings were always my mom’s favorite, which makes perfect sense -she’s a true chocolate lover. They have a deep, rich chocolate flavor without being overly sweet, with a light, crumbly texture that leans more shortbread than cookie. The richness of the chocolate pairs beautifully with the bright, citrusy lemon glaze, which cuts through just enough to keep each bite balanced rather than heavy. The recipe comes from my paternal grandmother in Switzerland, and it’s one I return to every holiday season. I don’t usually bake many chocolate-forward cookies at Christmas, but these are an exception. They’re straightforward to make, quick to bake, and they never last long. If you enjoy chocolate with contrast and restraint, these cookies deserve a spot in your holiday tin. SKIP TO RECIPE CARD SKIP TO VIDEO Rich Chocolate Flavor: These cookies are packed with an intense chocolate taste that's perfect for chocolate lovers. Delicate Shortbread Texture: Light and crumbly, they melt in your mouth with every bite. Easy and Quick to Make: The dough comes together effortlessly, and the baking time is short. Perfect Balance of Flavors: The slight bitterness of the chocolate pairs beautifully with the sweet, tangy lemon glaze. A Family Heirloom Recipe: This recipe carries a touch of nostalgia and tradition, making it extra special for the holidays. Customizable: You can adjust the glaze or cocoa powder to suit your taste preferences. Beautifully Festive: The contrast of dark chocolate and the light glaze makes these cookies a stunning addition to any cookie platter. What You'll Love Can I substitute almond flour with another type of flour? Yes, you can use hazelnut flour or finely ground nuts like walnuts or pecans as a substitute. Regular flour can work too, but the flavor and texture may differ. Can I use salted butter instead of unsalted? Yes, but reduce the added salt in the recipe by half or omit it entirely. How do I know when the cookies are done baking? These cookies bake quickly. Look for a set, matte surface. They will firm up as they cool. Can I make the dough in advance? Absolutely! You can refrigerate the dough for up to 2 days or freeze it for up to a month. Let it soften slightly before rolling. Do these cookies spread while baking? No. They hold their shape well, which makes them ideal for cut-out rings. Can I chill the dough? You don’t need to, but if your kitchen is warm or the dough feels too soft, chilling it for 15–20 minutes can make rolling easier and help them keep their shape. Can I use dark chocolate instead of semi-sweet? Yes. Dark chocolate works beautifully if you prefer a more intense chocolate flavor- just keep the glaze light. Frequently asked Questions Ingredints Explained Butter : This is a butter-forward dough, which gives the cookies their tender, shortbread-like texture. Make sure it’s softened, not melted. Melted Chocolate : Using real chocolate gives these cookies a smoother, richer flavor than cocoa alone, without making them heavy. Almond Flour : Adds structure and a subtle nuttiness while keeping the cookies delicate rather than dry. Lemon Juice : The acidity cuts through the richness of the chocolate and keeps the cookies from feeling too dense or sweet. Ingredients Dough: 380g unsalted butter (1 2/3 cups) 150g sugar (3/4 cup) 350g all-purpose flour (2 3/4 cups) 150-200g Semi-Sweet Chocolate (1 3/4 – 2 cups) - chopped and melted 200g almond flour (2 cups) 1 teaspoon vanilla (1 teaspoon) Glaze: 100g powdered sugar (3/4 cup) 2 tablespoons lemon juice (2 tablespoons) 1 tablespoon water (1 tablespoon) NEWSLETTER SIGN-UP Preparation Step-by-step instructions on how to make chocolate rings In a large bowl mix together butter and sugar until smooth and creamy. Add in the flour, chocolate and vanilla. When blended, slowly add in the almond flour. Use your hands to kneed all ingredients together. The dough will feel soft- and this is ok it will solidify once cooled. If it is overly tacky (like really sticking to your fingers- add a couple of spoonfuls of flour. Once you have a nice solid dough, lightly flour your work surface and rolling pin to prevent the dough from sticking. Roll your dough out so that it is about 5mm thick. (I like to work the dough in batches, I find it easier to handle and doesn't make me get too overwhelmed). Take a large round cookie cutter (approximately 7cm) and cut out your main circles. Then take a smaller circular cutter to cut out the center of each larger circle to make a doughnut shape. Preheat your oven to 375F . These cookies are a nice quick bake. So I do one cookie sheet at a time. Bake for 7-9 minutes . Let cool completely before glazing so that the glaze can set and doesn't melt off. While the cookies cool, make your glaze by combining the powdered sugar with the lemon juice and water. If you like a thicker glaze add less liquid. Powdered sugar becomes runny quite quickly, so if you feel you have added too much liquid, just add in a bit more sugar until you reach your desired consistency. Once your cookies have cooled, use a pastry brush to paint each cookie with a thin layer of sugar glaze. Let the glaze dry before serving. Recipe Card Chef's Notes Use good-quality chocolate. Since chocolate is the star here, choose one you enjoy eating on its own. Semi-sweet keeps the cookies balanced, while darker chocolate leans more intense and refined. Keep the dough cool but pliable. If the dough feels too soft while rolling, pause and chill it for 10–15 minutes. This helps the rings cut cleanly and hold their shape. Roll evenly. Aim for about 5 mm thickness across the dough. Thinner cookies will bake too quickly and lose their tender texture; thicker ones won’t bake evenly. Don’t overbake. These cookies should stay fairly pale. They’re done when they feel set but still soft—they’ll firm up as they cool. Glaze lightly. A thin, brushed-on layer of lemon glaze is all you need. It should add brightness, not overwhelm the chocolate. Let the glaze dry completely. Give the cookies time to set before stacking or storing so the glaze stays clean and glossy. Storage Tips Store glazed cookies in an airtight container at room temperature for up to 7 days . Layer them with parchment paper to protect the glaze. Unglazed cookies can be frozen for up to 2 months ; glaze after thawing for best results. Recipe Card RECIPE VIDEO Newsletter SignUP
- Classic Vegetable Minestrone Soup – Swiss-Inspired Recipes & Photography | Poetic Road
Packed with a colorful assortment of vegetables, beans, and pasta, this soup offers a comforting and satisfying bowl of warmth.| From Poetic Road by Christine Loertscher – Swiss-inspired recipes and photography. < Back Classic Vegetable Minestrone Soup Prep Time: 15 minutes Cook Time: 30 minutes Serves: 6-8 Servings Dec 26, 2025 Last updated: This recipe may contain affiliate links About the Recipe Living in a northern climate, where winters are long and hearty meals matter, soups that feel both nourishing and complete tend to earn a permanent place in the rotation. This Classic Vegetable Minestrone Soup is one of those bowls - robust, vegetable-packed, and satisfying enough to stand on its own, much like the soups you find across Alpine and Central European kitchens where warmth and practicality go hand in hand. While minestrone is proudly Italian, its spirit feels familiar if you love soups like Gerstensuppe (Swiss barley soup), a Leek and Potato Soup with Sausage , or even a light Flädlisuppe , where simple ingredients are layered thoughtfully and simmered into something deeply comforting. These are soups meant to sustain you - after a cold walk, a busy day, or when you just want dinner to feel grounding. This version is colorful, flexible, and built from everyday pantry staples: beans for heartiness, vegetables for freshness, pasta for comfort, and herbs that quietly do the heavy lifting. It’s the kind of soup that welcomes small substitutions, improves as it sits, and pairs beautifully with good bread and a sprinkle of cheese - exactly the kind of meal that earns repeat status during the colder months. SKIP TO RECIPE CARD SKIP TO VIDEO Comforting and Nourishing: This classic Italian soup is packed with vegetables, beans, and pasta, making it the perfect meal for any time of year. Customizable: You can tailor this recipe to suit your tastes and what you have on hand—perfect for using up leftovers or pantry staples. Hearty and Filling: With a variety of beans and pasta, this minestrone is satisfying enough to be a meal on its own. Healthy and Wholesome: Full of fiber, vitamins, and nutrients, this soup is as nutritious as it is delicious. Quick and Easy: Ready in under an hour, this recipe is simple enough for a weeknight dinner but impressive enough to serve to guests. Perfect for Meal Prep: Make a big batch and enjoy it throughout the week or freeze portions for a quick meal later on. Crowd-Pleaser: Serve it with grated Parmesan and crusty bread, and you’ll have a dish that everyone will love. What You'll Love Can I make this recipe vegan? Yes! Simply omit the Parmesan cheese or use a vegan Parmesan substitute to keep this recipe vegan-friendly. Can I use fresh tomatoes instead of canned? Absolutely! Use about 2 cups of fresh diced tomatoes. You might need to add a bit more broth to achieve the desired consistency. What other beans can I use? You can substitute the kidney or cannellini beans with chickpeas, black beans, or your favorite type of bean. Can I freeze minestrone soup? Yes! This soup freezes well, but leave out the pasta and spinach/kale before freezing. Add them when reheating to avoid mushy pasta and wilted greens. Can I use other vegetables? Of course! Minestrone is versatile—add vegetables like potatoes, sweet potatoes, bell peppers, or squash for variety. What can I substitute for fresh rosemary? If you don’t have fresh rosemary, use 1/2 teaspoon of dried rosemary or an additional pinch of oregano and thyme. Can I use gluten-free pasta? Yes, gluten-free pasta works well. Cook it separately and add it to the soup when serving to prevent it from getting too soft. Can I make this in a slow cooker? Yes! Sauté the vegetables and garlic first, then transfer everything except the pasta and greens to the slow cooker. Cook on low for 6-8 hours or high for 3-4 hours, adding the pasta and greens in the last 30 minutes. How can I make this soup more filling? Add shredded chicken, Italian sausage, or extra beans to make it heartier. You can also serve it with crusty bread on the side. Frequently asked Questions Ingredints Explained Onion, carrots & celery – the classic base that builds flavor Garlic – adds warmth without overpowering Diced tomatoes – bring acidity and body to the broth Kidney & cannellini beans – protein-rich and hearty Zucchini & green beans – freshness and texture Vegetable broth – keeps the soup light yet savory Dried herbs + fresh rosemary – layered, aromatic flavor Small pasta – makes the soup filling and comforting Spinach or kale – added at the end for color and nutrients Ingredients 2 tablespoons olive oil 1 onion, diced 2 carrots, sliced 2 celery stalks, chopped 3 cloves garlic, minced 1 can (14 oz) diced tomatoes 1 can (15 oz) kidney beans, drained and rinsed 1 can (15 oz) cannellini beans, drained and rinsed 1 zucchini, diced 1 cup green beans, chopped 4 cups vegetable broth 1 teaspoon dried oregano 1 teaspoon dried basil 1/2 teaspoon dried thyme 1 teaspoon fresh rosemary, finely chopped 1 cup small pasta (e.g., ditalini) Salt and pepper to taste 3 cups spinach or kale, chopped Grated Parmesan cheese for serving Spoonful of pesto (optional) NEWSLETTER SIGN-UP Preparation Here are the Step-by-Step instructions on how to make this classic Minestrone Soup! Get your veggies ready! Prepare your ingredients: Rinse your beans, chop your onions and garlic, slice your carrots and celery, and prepare your kale and spices. Sauté the vegetables: In a large pot, heat olive oil over medium heat. Add onion, carrots, celery, and garlic. Cook until vegetables are softened. Add in the beans and Zucchini: Stir in diced tomatoes, kidney beans, cannellini beans, zucchini, and green beans. Add the broth and herbs: Add vegetable broth, oregano, basil, thyme, rosemary, salt, and pepper. Bring to a boil, then reduce heat and simmer for 20 minutes. Cook the pasta: Meanwhile, cook pasta according to package instructions. Drain and set aside. Add remaining ingredients: Add cooked pasta and chopped spinach or kale to the soup. Cook for an additional 5 minutes until the greens are wilted. Season and Serve: Adjust seasoning if needed. Serve hot, garnished with grated Parmesan cheese. I also love adding a small spoonful of pesto if I have it on hand for that extra layer of herby deliciousness. Enjoy! If you enjoy this soup recipe you may also like: Swiss Barley Soup (Gerstensuppe) Classic French Onion Soup Pickle Soup Items used in this recipe: Please note that as an amazon associate, I may recieve a small commission for qualified purchases made through these links. Le Creuset Pot: Amazon.ca Recipe Card Chef's Notes Don’t rush the sauté — slow cooking builds flavor Keep the simmer gentle, not aggressive Add pasta only when ready to serve or store separately A spoonful of pesto at the end adds a beautiful finish Storage Tips Refrigerator: Keeps well for 3–4 days Freezer: Freeze without pasta for best texture Reheating: Add a splash of broth or water Recipe Card RECIPE VIDEO Newsletter SignUP
- Spaetzli – Swiss-Inspired Recipes & Photography | Poetic Road
Delicious small irregularly shaped pasta from Switzerland. Perfect to pair with the sauce and flavoring of your choosing.| From Poetic Road by Christine Loertscher – Swiss-inspired recipes and photography. < Back Spaetzli Prep Time: 10 minutes Cook Time: 3 minutes Serves: 4-6 Servings Oct 23, 2025 Last updated: This recipe may contain affiliate links About the Recipe Spaetzli is one of those dishes that instantly takes me back to my childhood kitchen—simple, comforting, and deeply nostalgic. Much like Swiss Alpine Macaroni or Swiss Pancake Soup ( Flädli Suppe ) , it’s one of those humble meals made from pantry staples that somehow feels like a warm hug in a bowl. Whether served plain with a bit of butter or piled high with sauce, these tender little noodles never disappoint. Traditionally made in Switzerland and parts of Germany, Spaetzli —which comes from Spatz , meaning “little sparrow” in German—is named for their small, irregular shape. They’ve been a staple for centuries for good reason: easy to make, satisfying to eat, and endlessly versatile. Growing up, I’d often see them served alongside Zürcher Geschnetzeltes —that creamy veal and mushroom dish so loved in Swiss kitchens—or simply tossed with cheese and caramelized onions for an Alpine-style mac-and-cheese. At home, my mom used nothing more than a cutting board and knife to make hers—scraping each bit of dough into boiling water with steady hands while I watched in awe. These days, I use a proper Spaetzli colander (worth every penny!), but that sense of home and tradition still lingers every time I make them. My go-to serving style is with a creamy mushroom sauce, but they’re just as delicious with roasted meats, pan-seared salmon, or spooned straight from the pot with melted butter and herbs. However you serve them, Spaetzli will always deliver comfort, flavor, and a touch of Swiss soul. SKIP TO RECIPE CARD SKIP TO VIDEO Authentic Comfort Food: This recipe brings the cozy, traditional flavors of Switzerland or Germany to your table, perfect for weeknight dinners or special occasions. Quick and Simple: With just a handful of ingredients and a straightforward method, you can enjoy homemade pasta in no time. Customizable: Add herbs, spices, or even cheese to the dough for a personalized twist. Versatile: Spaetzli can be served as a side dish, a main course, or even pan-fried for a crispy texture the next day. Make-Ahead Friendly: Perfect for meal prep, you can store or freeze spaetzli for a quick and delicious addition to any meal. Crowd-Pleaser: Its buttery, tender bites are loved by both kids and adults, making it a hit at any gathering. What You'll Love 1. Can I use a different type of flour for this recipe? Yes, you can use whole wheat flour or a gluten-free flour blend if you prefer, though the texture may be slightly different. Experiment to find the balance you like! 2. Do I need a spaetzli maker to make this recipe? No, you don’t need a spaetzli maker. You can use a colander or a slotted spoon to press the dough into boiling water, though a spaetzli maker makes the process quicker and easier. 3. Can I make spaetzli ahead of time? Absolutely! Cook the spaetzli and let them cool completely. Store them in an airtight container in the refrigerator for up to 2 days. Reheat them in a skillet with butter or oil before serving. 4. Can I freeze spaetzli? Yes, spaetzli freezes well. Spread the cooked spaetzli on a baking sheet to freeze individually, then transfer to a freezer bag. They’ll keep for up to 3 months. Reheat them from frozen in a skillet or boiling water. 5. What can I serve with spaetzli? Spaetzli pairs wonderfully with dishes like Zürcher Geschnetzeltes, creamy mushroom sauce, stews, or even a simple butter and herb mixture. 6. Can I make this dairy-free? Yes, substitute the milk with a non-dairy alternative like almond milk or oat milk. Use vegetable oil instead of butter for cooking. 7. What does the nutmeg add to the recipe? Nutmeg adds a warm, subtle depth of flavor. It’s optional but highly recommended for an authentic taste. 8. Can I make spaetzli without eggs? Eggs are key to the traditional texture, but you can try an egg substitute or aquafaba if needed. The consistency will vary. Frequently asked Questions Ingredints Explained Ingredients Spaetzli: 2 cups all-purpose flour 3 large eggs 1/2 cup milk 1/2 teaspoon salt 1/4 teaspoon freshly ground nutmeg (optional) Cooking and serving: 1-2 tablespoons butter or vegetable oil for cooking Salt and pepper, to taste Freshly chopped parsley for garnish (optional) NEWSLETTER SIGN-UP Preparation In a large mixing bowl, combine the flour, salt, and nutmeg. Make a well in the center of the flour mixture. In a separate bowl, whisk together the eggs and milk. Gradually pour the egg mixture into the well in the flour. Using a wooden spoon or a spatula, slowly incorporate the wet and dry ingredients, stirring until you have a smooth, thick batter. The batter should be thicker than pancake batter but thinner than dough. If it's too thick, you can add a little more milk. Let the batter rest for about 20-30 minutes. This allows the flour to fully hydrate and helps achieve the right spaetzli texture. While the batter is resting, bring a large pot of salted water to a boil. Once the water is boiling, reduce the heat to a gentle simmer. Pour your batter onto spaetzli maker , a colander with large holes, or a slotted spoon, using a dough scraper or spatula, carefully push the batter through the holes so that small portions of the batter drop into the simmering water. You can also use a knife to scrape small pieces of dough directly into the water off of a cutting board if you don't have the above mentioned tools. The spaetzli will cook quickly and rise to the surface when they are ready, which usually takes about 2-3 minutes. Use a slotted spoon to remove the cooked spaetzli from the water and transfer them to a colander to drain. Repeat this process with the remaining batter. In a large skillet, heat the butter or vegetable oil over medium heat. Once the butter is melted and begins to sizzle, add the cooked spaetzli to the skillet. Sauté the spaetzli for a few minutes, stirring occasionally, until they start to turn golden brown. Season the spaetzli with salt and pepper to taste. Garnish with freshly chopped parsley if desired. Serve the spaetzli hot as a side dish alongside your favorite main course or with a sauce of your choice. They pair well with gravy, cheese sauce, or a simple butter and herb sauce. Below find the items I used for this recipe. Please note, that as an amazon affiliate, I can earn commission from qualified purchases made through my links. Amazon.ca Amazon.com Recipe Card Chef's Notes Storage Tips Recipe Card RECIPE VIDEO Newsletter SignUP
- Leek and Gruyère Quiche – Swiss-Inspired Recipes & Photography | Poetic Road
A delightful combination of flaky crust, savory leeks, and creamy Gruyère cheese – perfect for a brunch or as an appetizer| From Poetic Road by Christine Loertscher – Swiss-inspired recipes and photography. < Back Leek and Gruyère Quiche Prep Time: 20 minutes Cook Time: 30 minutes Serves: 8-10 Servings Dec 5, 2025 Last updated: This recipe may contain affiliate links About the Recipe If you’ve tried my Plum Wähe or Tomato Tart , you already know I have a soft spot for simple, rustic recipes that let seasonal produce shine. This Leek Quiche is no exception. It takes the humble leek—those mild, oniony stalks often overlooked—and turns them into the star of a cozy, buttery, golden slice of comfort. Much like my Creamy Potato, Leek and Sausage Soup , this quiche proves that leeks can be hearty, flavorful, and deeply satisfying.Baked into a flaky crust and nestled into a creamy, nutmeg-scented filling, this quiche is endlessly adaptable. Add a bit of cheese, some herbs, or crisp bacon if you like—it's the kind of recipe that fits whatever you have on hand. Whether you’re hosting brunch or just looking for a cozy lunch idea, this is one of those quiet showstoppers that brings warmth and flavor to the table every single time. SKIP TO RECIPE CARD SKIP TO VIDEO Leeks shine as the star - buttery, sweet, melt-in-your-mouth perfect. Gruyère adds a classic Swiss nuttiness that makes every bite luxurious. A flaky homemade crust that feels extra special (but you can use store-bought). Elegant but incredibly simple to make. Perfect for brunch, lunch, or a light dinner with a salad. Make-ahead friendly - great warm, room temp, or chilled. Customizable - add bacon, herbs, or switch up the cheese. What You'll Love Do I need to pre-cook the leeks? Yes! Sautéing the leeks before adding them to the quiche softens them and brings out their natural sweetness. Can I use a store-bought pie crust? Absolutely! A store-bought crust works well if you're short on time, but a homemade crust will add extra flakiness and flavor. What type of cheese works best? Gruyère, Swiss, or sharp cheddar pair beautifully with leeks, but you can also experiment with goat cheese or feta for a tangy twist. How do I prevent a soggy crust? Blind baking (pre-baking) the crust for a few minutes before adding the filling helps keep it crisp. Can I make this quiche ahead of time? Yes! Bake it in advance and store it in the fridge for up to 3 days. Reheat gently in the oven to keep the crust crispy. Is this quiche freezer-friendly? It sure is! Let it cool completely, wrap it well, and freeze for up to 2 months. Thaw overnight in the fridge and reheat in the oven before serving. Can I make this quiche without dairy? Yes, swap out the cream for a dairy-free alternative like coconut milk or a rich cashew-based cream, and use a dairy-free cheese substitute. What can I serve with leek quiche? A simple green salad with a bright vinaigrette, roasted potatoes, or a bowl of soup makes a great side. Can I add extra veggies or protein? Of course! Sautéed mushrooms, spinach, or even cooked bacon or ham make great additions to the filling. How do I know when my quiche is fully baked? The center should be just set but slightly jiggly. A knife inserted near the middle should come out clean. Frequently asked Questions Ingredints Explained Leeks: Mild, sweet, oniony flavor that becomes silky when sautéed — the star of this recipe. Butter: Helps the leeks caramelize and develop richness. Eggs: The structure of any good quiche — they hold everything together. Heavy Cream: Makes the filling velvety and custardy. Gruyère: Nutty, melty, slightly sharp — a perfect match for leeks. Thyme: Adds earthiness and a gentle herbal note. Nutmeg: Classic in Swiss and French quiches — adds warmth and depth. Salt & Pepper: Simple seasoning that lets the leeks shine. Homemade crust: Buttery and flaky — worth the effort, but store-bought works too. Ingredients For the Crust: 155 g all-purpose flour (1¼ cups) 113 g unsalted butter, cold and cubed (½ cup / 1 stick) 1 g salt (¼ tsp) 45–60 g ice water (3–4 tbsp) For the Filling: 3 large leeks, cleaned and thinly sliced (about 450–500 g total) 28 g unsalted butter (2 tbsp) 150 g eggs (3 large eggs) 240 g heavy cream (1 cup) 100 g grated Gruyère cheese (1 cup, packed) 1 g fresh thyme (½ tsp, finely chopped + extra for garnish) ½ g ground nutmeg (¼ tsp) Salt and pepper to taste NEWSLETTER SIGN-UP Preparation Begin by making the crust. In a large bowl or food processor, combine the flour and salt. Add the cold, cubed butter and use your hands or pulse until the mixture resembles coarse crumbs. Gradually add the ice water, one tablespoon at a time, until the dough starts coming together. Turn the dough out onto a floured surface and knead it into a ball. Flatten it into a disc, wrap it in plastic wrap, and refrigerate for at least 30 minutes . Preheat your oven to 375°F (190°C). While the dough is chilling, prepare the leek filling. In a large skillet, melt the 2 tablespoons of butter over medium heat. Add the sliced leeks and cook until they become soft and slightly caramelized, about 10-15 minutes . Season with salt and pepper, and set aside to cool. Roll out the chilled dough on a floured surface to fit a tart or quiche pan. Place the dough in the pan, trimming any excess from the edges. In a bowl, whisk together the eggs and heavy cream. Season with a bit of salt and pepper. Spread the cooked leeks over the crust, then pour the egg and cream mixture over the leeks. Sprinkle the grated Gruyère cheese on top. Bake in the preheated oven for 30-35 minutes or until the quiche is set and the top is golden brown. Once out of the oven, let the quiche cool for a few minutes. Optionally, garnish with fresh thyme leaves. Serve your leek and gruyère quiche warm or at room temperature. Enjoy! Recipe Card Chef's Notes Clean leeks well — they trap dirt in their layers. Don’t overcook the custard; a little wobble is perfect. Chill the dough long enough to prevent shrinking. This quiche is delicious warm, room temp, or chilled. For extra flavor, sprinkle thyme on top after baking. Storage Tips Store in the fridge for 3–4 days . Reheat at 325°F until warm, or enjoy cold. Recipe Card RECIPE VIDEO Newsletter SignUP
- Rainbow Bundt Cake – Swiss-Inspired Recipes & Photography | Poetic Road
Made with natural dyes, this classic bundt cake is not only moist and delicious but it adds a fun twist to afternoon tea time. | From Poetic Road by Christine Loertscher – Swiss-inspired recipes and photography. < Back Rainbow Bundt Cake Prep Time: 15 minutes Cook Time: 45 minutes Serves: 8-10 Servings Oct 23, 2025 Last updated: This recipe may contain affiliate links About the Recipe I’ve always loved Bundt cakes for their simplicity—you don’t need fancy decorating skills to make one look beautiful. The pan does the work, and the result always feels a little bit special. For this Rainbow Bundt , I wanted to play with color inside the cake, similar to how I had fun with the bold color in my Red Velvet Cupcakes or the party magic of my Rainbow Popcorn . I used the lemon base from my Lemon Pistachio Bundt Cake —because lemon just pairs so well with everything—and swirled in natural dyes to create a rainbow marbled effect. The powders—purple sweet potato, butterfly pea flower, beetroot, and cranberry juice—add beautiful, earthy tones. The flavors are soft and subtle (except the cranberry, which has a nice little zing that works well with the lemon). I tested it a few times to get the colors right—beetroot especially loves to fade in the oven—but blending it with cranberry helped keep some of that pinky red. If you’re looking for a fun, naturally colorful cake that’s as joyful to cut into as it is to eat, this Bundt might be just the thing. SKIP TO RECIPE CARD SKIP TO VIDEO Vibrant Colors from Natural Ingredients : Made with natural dyes from ingredients like turmeric, beetroot, and spirulina, this cake is a stunning rainbow creation with no artificial colors. Deliciously Moist and Flavorful : This bundt cake is as tasty as it is beautiful, with a moist crumb and a light, vanilla or citrus flavor that pairs well with the natural hues. Fun and Wholesome : Perfect for celebrations, this cake offers a fun, healthier way to enjoy rainbow colors, making it ideal for kids’ parties or special occasions. Impressive Presentation : The bright layers and bundt shape make this cake a showstopper, bringing a burst of color and joy to any dessert table. Easy to Adapt with Favorite Flavors : Add a touch of lemon zest or vanilla extract to the batter, or drizzle with a simple glaze for extra flavor without overpowering the natural colors. Perfect for Natural-Living Enthusiasts : For those who avoid artificial colors, this cake offers a vibrant and healthy way to enjoy a colorful dessert that’s free from synthetic additives. What You'll Love What types of natural dyes work best for a rainbow bundt cake? Plant-based powders, like beetroot, turmeric, and spirulina, are ideal for vibrant colors. For best results, use fine powders from sources like Selefina to ensure even coloring. Will the natural dyes affect the cake's flavor? Most natural dyes have subtle flavors, but they typically blend well with cake batter. For a more neutral taste, adjust the quantity slightly or pair with flavors like vanilla or citrus. Can I make the cake layers without artificial colors? Absolutely! This recipe uses only natural dyes, providing beautiful colors without any synthetic ingredients, perfect for those who prefer natural alternatives. How should I store the rainbow bundt cake? Keep the cake in an airtight container at room temperature for up to 3 days or in the refrigerator if you prefer it slightly chilled. The colors stay vibrant and fresh for several days. Can I freeze leftover rainbow bundt cake? Yes! Slice the cake and wrap each piece in plastic wrap before freezing. Let it thaw at room temperature when you’re ready to enjoy a colorful, natural treat. Frequently asked Questions Ingredints Explained Ingredients Cake 375 g all-purpose flour (3 cups) 12 g baking powder (1 tbsp) 3 g baking soda (½ tsp) 3 g salt (½ tsp) 227 g unsalted butter, softened (1 cup) 400 g granulated sugar (2 cups) 4 large eggs 5 g vanilla extract (1 tsp) 240 g buttermilk (1 cup) – see blog for DIY tip Zest of 2 lemons 30 g fresh lemon juice (2 tbsp) Natural Coloring Powders *Use a few drops of food coloring if you do not have natural powders 6 g purple sweet potato powder (2 tsp) 6 g butterfly pea powder (2 tsp) 6 g beetroot powder (2 tsp) 6 g cranberry juice powder (2 tsp) Optional: powdered sugar for dusting NEWSLETTER SIGN-UP Preparation Preheat your oven to 350°F (175°C). Grease and flour a 10-inch Bundt pan. In a medium bowl, whisk together the flour, baking powder, baking soda, and salt. Set aside. In a large mixing bowl, cream together the butter and sugar until light and fluffy. Beat in the eggs, one at a time, then stir in the vanilla extract. Gradually add the dry ingredients to the wet ingredients, alternating with the buttermilk, beginning and ending with the dry ingredients. Mix until just combined. Stir in the lemon zest and lemon juice until well incorporated. Divide the batter into 4 small bowls. Add the coloring type of your choice to each bowl. I put the beetroot and cranberry powders into the same bowl, the butterfly pea into its own and the purple sweet potato into its own as well. The last bowl of batter will be left as is. Mix the powders into each bowl until the dyes are well incorporated. Alternate pouring in the colored batters into the prepared Bundt pan and use a knife or cooking skewer to zig-zag through the batter to create a marble effect. Smooth the top with a spatula. Bake in the preheated oven for 45-55 minutes, or until a toothpick inserted into the center comes out clean. Allow the cake to cool in the pan for 10 minutes, then invert it onto a wire rack to cool completely. Once the cake has cooled, dust with powdered sugar. Slice, serve, and enjoy your delicious Rainbow Bundt cake! Tips If you don't have buttermilk on hand, you can easily make a substitute using milk and lemon juice or vinegar: Measure out 1 cup of milk (whole milk or 2% milk works best). Stir in 1 tablespoon of lemon juice or white vinegar. Let the mixture sit for about 5-10 minutes to allow it to curdle and thicken slightly. After it has thickened slightly and looks somewhat curdled, it's ready to use as a substitute for buttermilk in your recipe. Recipe Card Chef's Notes Storage Tips Recipe Card RECIPE VIDEO Newsletter SignUP
- Swiss Anise Cookies (Chrabeli) – Swiss-Inspired Recipes & Photography | Poetic Road
With a crunchy exterior and chewy center, these delightful Swiss anise cookies will be the most unique ones you'll try this holiday season.| From Poetic Road by Christine Loertscher – Swiss-inspired recipes and photography. < Back Swiss Anise Cookies (Chrabeli) Prep Time: 30 minutes Cook Time: 30-40 Minutes Serves: 48 cookies Dec 15, 2025 Last updated: This recipe may contain affiliate links About the Recipe Every Swiss cookie tin tells a story, and Chrabeli are one of the characters you can’t forget. Their delicate anise aroma instantly transports me back to snowy winters baking with my mother and discussing my grandmothers tricks to making them perfect. Unlike the jewel-toned Spitzbuebe , the spiced Cinnamon Stars , or the bright lemon Mailänderli , these cookies stand in a category all their own. With their airy texture, subtle sweetness, and unmistakable anise flavor, Chrabeli bring a touch of old-world charm to the Swiss Christmas cookie lineup. Chrabeli have a personality that’s both elegant and rustic: crisp on the outside, soft and chewy within, and delicately perfumed with anise. Made from just powdered sugar, eggs, and flour, their snow-white finish feels perfectly fitting for winter. Traditionally, they’re shaped by hand into small crescents marked with slits, though I also love the molded Anisbrotli version, with its beautifully carved surface and subtle sheen. Like many Swiss classics, these cookies are deceptively simple but require a little patience - an overnight rest before baking allows their flavor and texture to fully develop (and gives them the ability to grow their "feet"). They keep beautifully in an airtight container and are the kind of cookie that quietly endures, even as the others disappear - a special cookie (and one of my favorites) with history, character, and a flavor that’s uniquely its own. SKIP TO RECIPE CARD SKIP TO VIDEO A Taste of Tradition: These cookies bring the flavors of Swiss holiday baking to your home. Unique Anise Flavor: The anise seed adds a mild licorice-like note that pairs perfectly with the delicate sweetness. Perfect for Holidays: Chrabeli are a festive addition to any Christmas cookie platter. Simple Ingredients: Made with pantry staples, this recipe is easy to whip up without special shopping trips. No Fancy Tools Needed: Shaping the cookies by hand gives them a charming, rustic look. Great for Gifting: These cookies are beautiful and sturdy, making them ideal for gifting during the holiday season. Family Memories: Shaping Chrabeli together is a fun activity that can create special moments with family or friends. What You'll Love 1. What are Chrabeli? Chrabeli are traditional Swiss cookies flavored with anise seed, known for their distinct flavor and unique crescent-like shape. They are a beloved holiday treat in Switzerland. 2. Can I substitute anise seeds? If you're not a fan of anise, you can substitute it with fennel seeds or even ground cardamom for a different flavor profile, but it won’t have the traditional Chrabeli taste. 3. Do Chrabeli require any special tools? No special tools are required. The dough is typically shaped by hand into crescents, which adds to their rustic charm. 4. Can I make the dough in advance? Yes! Chrabeli dough can be prepared a day ahead and refrigerated. Let it come to room temperature before shaping and baking. 5. How do I achieve the perfect texture? Chrabeli should be slightly crisp on the outside but tender and light on the inside. Avoid overbaking, as this can make them too hard. 6. Can I use granulated sugar instead of powdered sugar? Powdered sugar is traditional in this recipe and helps create a smooth dough texture. It's best not to substitute it with granulated sugar. 7. How long do Chrabeli stay fresh? Stored in an airtight container, Chrabeli can stay fresh for up to 2 weeks. They also freeze well if you want to make them ahead. Frequently asked Questions Ingredints Explained Eggs – Provide structure and richness while helping the cookies rise slightly as they bake. Powdered Sugar – Creates a smooth, delicate sweetness and contributes to the cookie’s signature pale white color. All-Purpose Flour – Gives the cookies body while keeping their texture light and tender. Anise Seeds or Ground Anise – The star flavor; warm, aromatic, and slightly sweet without overpowering the other ingredients. Salt – Balances sweetness and subtly enhances the anise flavor. Ingredients Ingredients: 4-5 eggs (4-5 large eggs) 500g powdered sugar (4 cups) 500g all-purpose flour (4 cups) 1 1/2 teaspoons anise seed (1 1/2 teaspoons) Pinch of salt (a pinch, about 1/8 teaspoon) Notes: The number of eggs may vary slightly depending on their size and the dough consistency you prefer. Start with 4 and add the 5th if needed for the right texture. For the most authentic flavor, lightly crush the anise seeds to release their aroma before incorporating them into the dough. NEWSLETTER SIGN-UP Preparation In a large bowl, mix together the eggs and powdered sugar. In a separate bowl, mix flour with salt and anise seeds. Using your hands (or a stand mixer with paddle attachment), add flour mixture to sugar mixture bit by bit until everything is well incorporated. The dough may be slightly dry. This is normal. If you feel it is much to dry you can add a couple of tablespoons of luke warm water. You do not want the dough to be too sticky though, so go bit by bit. It should hold it's shape but just barely, it may crack a little and that is normal. If the dough feel too wet- add a little more powdered sugar - DO NOT ADD FLOUR- this will only lead to hard cookies. Use some powdered sugar to lightly dust your work surface so that the dough does not stick to it as you form your cookies. Take a portion of dough and gently roll it out into a 2cm thick roll. Cut the roll at an angle into 8cm long sections. Take each section and make two shallow angled slits on one side. Now bend the section to form a 'U' shape (in the opposite direction of the slits). Place your 'Chrabeli' on lined baking sheets and cover with a kitchen towel. They will now have to 'rest' over night. This 'resting' phase will allow the outside of the Chrabeli to harden a bit and help give them their awesome texture and raised base. (A trick learned from my grandmother). If you have embossed moulds you can also roll the dough out (1cm thick) and stamp out cookies- these would be called Anisbrötli as in the image above When you are ready to bake preheat your oven to 300F . You want these cookies to bake low and slow. That is what helps give them the crunchy outside and the awesome chewy center. Bake for 30-40 minutes . You'll know when they are done when the top of the cookie pops upwards so that it leaves the very important raised bottoms that are lightly golden. (Note: To ensure the slow and low baking process, my grandmother would also stick the handle of a wooden spoon in the side of the oven door to keep it from closing all the way). These cookies definitely require a little patience and effort. But they are absolutely worth it. Along with Spitzbuebe and Cinnamon Stars , these are part of my favorites. Would love to know if you try them! Recipe Card Chef's Notes Let them rest: The key to perfect Chrabeli is patience - the overnight drying period allows the surface to firm up so the cookies develop their crisp shell and chewy center when baked. Choose your form: Traditional Chrabeli are shaped by hand into small crescents with slits, while Anisbrotli are pressed in carved molds for intricate, elegant designs. Gentle baking: Bake at a moderate temperature until just lightly golden on the bottom - they should stay pale on top. Subtle flavor: If you’re hesitant about anise, start with a little less; the flavor deepens gently after baking. Perfect for gifting: Their beautiful shape and long shelf life make them ideal for holiday cookie boxes or festive swaps. Storage Tips Store in an airtight container at room temperature for up to 3–4 weeks . Place parchment paper between layers to prevent sticking. The flavor continues to develop over time - they actually taste better a few days after baking. Avoid storing them with moister cookies (like Spitzbuebe or Mailänderli ) to maintain their delicate crispness. Recipe Card RECIPE VIDEO Newsletter SignUP
- Potato Carrot Potage – Swiss-Inspired Recipes & Photography | Poetic Road
This potage has a creamy and velvety texture with a subtle sweetness of carrots and the warm hearty comfort of potatoes.| From Poetic Road by Christine Loertscher – Swiss-inspired recipes and photography. < Back Potato Carrot Potage Prep Time: 25 Minutes Cook Time: 20 Minutes Serves: 4-6 Servings Oct 14, 2025 Last updated: This recipe may contain affiliate links About the Recipe When the days get chilly and all I want is something warm and nourishing, a pot of soup is always the answer—and this Carrot and Potato Potage hits just the right note. It’s creamy, cozy, and comes together with just a handful of simple ingredients. No fuss, no fancy techniques—just a smooth, velvety soup that feels like a warm blanket in a bowl. I’ve always had a soft spot for soups that are hearty and easy. If you’ve tried my Potato, Leek and Sausage Soup , you already know I love tossing root veggies and aromatics into a pot and letting them work their magic. This potage takes a slightly more elegant route—think fewer chunks, more silky spoonfuls—like my Leek and Potato Potage , but with a little more natural sweetness from the carrots. And if you’re into that slightly sweet and earthy combo, you’d probably also love my Butternut Squash and Potato Soup too. This one is perfect for when you need something quick, filling, and satisfying—whether it’s a weeknight dinner or a Sunday slow-down kind of meal. And the best part? It’s just as good reheated the next day (maybe even better). Let’s get cooking! SKIP TO RECIPE CARD SKIP TO VIDEO Ultra Creamy Texture – This soup gets blended until silky smooth, giving you that classic potage feel that’s cozy and elegant all at once. Simple, Nourishing Ingredients – Potatoes, carrots, garlic, and onion are pantry staples that come together to create rich, comforting flavor with minimal effort. Naturally Sweet & Savory – The carrots add a subtle sweetness that balances beautifully with the herby base and mellow potatoes. Perfect Make-Ahead Meal – It keeps well in the fridge and tastes just as good (if not better!) the next day. Customizable – Add a splash of cream, a swirl of yogurt, or some crispy croutons on top—this soup plays well with all kinds of toppings. What You'll Love Can I use a different type of potato? Yes! Yukon Golds are great for a naturally buttery flavor and creamy texture, but russets or even red potatoes work well too. Just avoid waxy varieties like new potatoes, which won’t blend as smoothly. Do I have to peel the carrots and potatoes? Peeling is recommended for the smoothest texture, especially for a potage. That said, if you’re short on time and your produce is clean, it’s totally okay to leave the skins on—just expect a more rustic finish. Can I make this without a blender? You can mash it with a potato masher for a chunky version, but to get that classic potage creaminess, a blender or immersion blender is key. Can I freeze it? Definitely. Let it cool completely, then transfer to airtight containers and freeze for up to 3 months. Just give it a good stir when reheating, and maybe a splash of broth or water to loosen it up. What can I serve with it? A slice of crusty bread, a grilled cheese, or even a herby salad on the side. It’s also lovely as a starter before a main meal. Frequently asked Questions Ingredints Explained Ingredients 2 tablespoons Extra Virgin Olive Oil 1 Onion 1 clove of Garlic 6 large Carrots 2 Medium Yellow Potatoes 6-8 cups Vegetable Stock 1 Bay Leaf 1 teaspoon Oregano 1 teaspoon Thyme Salt and Pepper to taste NEWSLETTER SIGN-UP Preparation Begin by peeling and roughly chopping all of your main ingredients. That is the most work that you will have to do for this recipe. Once everything has been prepared, heat some olive oil in a deep sauce pan and add the onion and garlic. Fry the onion and garlic until they start to become translucent and fragrant. Add in the chopped carrots and potatoes, stir and pour in the vegetable broth. If you do not have vegetable broth, it can be replaced by chicken broth as well. Bring everything to a boil over medium-high heat , stirring occassionally. Add in the bay leaf, oregano and thyme. Boil until the carrots and potatoes have softened and you can easily poke a fork through them (approx. 20 minutes). Once the vegetables are cooked through, remove the bay leaf from the soup and let the soup cool for 20-30 minutes before adding it to your blender (or before using your hand blender to purée it). Once cooled, add your cooked vegetables to your blender or food processor and blend until you achieve your desired consistency. If you find that it is too thick, simply add some more stock or some water to thin it out. Return your blended soup to the saucepan, warm it back up, add salt and pepper to taste and serve! I love serving any soup with a warmed up baguette or some fresh croutons. You can even drizzle some cream overtop the soup and add fresh herbs as garnish. Hope this wonderful potage satisfies your tastebuds and warms your soul like it does for me. Bon ap! Recipe Card Chef's Notes Storage Tips Recipe Card RECIPE VIDEO Newsletter SignUP
- Chocolate Pumpkin Zebra Loaf – Swiss-Inspired Recipes & Photography | Poetic Road
This delightful loaf combines the flavors of chocolate and pumpkin in a visually appealing zebra pattern. Perfect for a fall inspired treat!| From Poetic Road by Christine Loertscher – Swiss-inspired recipes and photography. < Back Chocolate Pumpkin Zebra Loaf Prep Time: 15 minutes Cook Time: 50 minutes Serves: 10-12 Slices Dec 22, 2025 Last updated: This recipe may contain affiliate links About the Recipe There’s something about the shift into fall that completely transforms the way I bake. As soon as the mornings turn crisp and pumpkins start popping up everywhere, I reach for those cozy, spiced flavors I love—like the warm notes in my Classic Pumpkin Pie , the chewy cinnamon kick of my Pumpkin Spice Cookies , or that Pumpkin Spice Chai Pudding I fully justify as breakfast (and honestly, no regrets there). This Chocolate Pumpkin Zebra Loaf is a little spooky, a little cozy, and totally perfect for the season. It swirls together rich chocolate and spiced pumpkin batter in a beautiful marbled pattern that’s surprisingly easy to create and even more fun to slice into. Every bite is that perfect balance of deep cocoa richness and soft, warmly spiced pumpkin cake. To top it off, a layer of tangy cream cheese frosting adds just the right contrast—and if you’re feeling festive, go ahead and decorate it with spiderweb drizzles, candy eyes, or a mummy-style glaze. It’s playful, delicious, and totally Halloween-party ready. Whether you're baking it up for a gathering or just treating yourself to a slice with your favorite latte, this loaf delivers on flavor and fall vibes. It’s one of those bakes that feels as magical as the season itself. SKIP TO RECIPE CARD SKIP TO VIDEO Swirls of fall flavor – Rich chocolate and warmly spiced pumpkin come together in each gorgeous marbled slice. Halloween-ready and beyond – Dress it up with spooky cream cheese frosting for Halloween or keep it simple for a cozy fall loaf. Moist, tender texture – Thanks to the pumpkin, this loaf stays soft and flavorful for days. Easy to make (and impressive to look at) – That zebra swirl looks fancy, but it’s actually really simple to do. Perfect with a latte – Especially anything pumpkin or chai-spiced. What You'll Love How do I get the zebra swirl effect? It’s easier than it looks! You just alternate spoonfuls of chocolate and pumpkin batter in the center of your loaf pan, layering one on top of the other. As it bakes, the pattern naturally forms. You can also gently swirl with a skewer if you want a more marbled look. Can I skip the cream cheese frosting? Definitely. The loaf is delicious on its own. But if you love a tangy-sweet contrast, the frosting adds a beautiful finish—especially if you're decorating for Halloween. Can I make this ahead of time? Yes! It keeps well for up to 3 days at room temperature (covered), or in the fridge for 5 days. It also freezes beautifully—just wrap the unfrosted loaf tightly and freeze for up to 2 months. Can I use fresh pumpkin instead of canned? Yes, just make sure it’s well-puréed and not too watery. If your homemade purée is on the wet side, drain it a little first to avoid a soggy loaf. Can I bake this in a different pan? Yes—an 8x8 inch square pan works too, though the bake time may be a little shorter. You can also make it into muffins; just reduce the baking time to about 18–22 minutes and keep an eye on them. How sweet is the loaf? It’s gently sweet—perfect for a snack or light dessert. If you’re looking for a dessert-level sweetness, the cream cheese frosting takes it there. Frequently asked Questions Ingredints Explained Pumpkin purée: Brings moisture and warm fall flavor. Use plain canned pumpkin, not pumpkin pie filling. Cocoa powder: Adds deep chocolate flavor that contrasts beautifully with the pumpkin batter. Spices: Cinnamon and nutmeg keep the pumpkin layer warm but balanced. Hot water (chocolate batter): Helps bloom the cocoa powder for richer flavor. Cream cheese frosting: Optional, but adds tang and makes the loaf extra festive. Ingredients For the Pumpkin Batter: 1 cup canned pumpkin puree 1/2 cup granulated sugar 1/4 cup vegetable oil 1 large egg 1 teaspoon vanilla extract 1 cup all-purpose flour 1/2 teaspoon baking powder 1/2 teaspoon baking soda 1/2 teaspoon ground cinnamon 1/4 teaspoon ground nutmeg 1/4 teaspoon salt For the Chocolate Batter: 1/2 cup granulated sugar 1/4 cup unsweetened cocoa powder 1/2 teaspoon baking soda 1/4 cup hot water 1/2-3/4 cup All-Purpose Flour For the Icing (optional): 4 oz (1/2 cup) cream cheese, softened 2 tablespoons unsalted butter, softened 2 cups powdered sugar 1 teaspoon vanilla extract NEWSLETTER SIGN-UP Preparation Preheat your oven to 350°F (175°C) and grease a 9x5-inch loaf pan. In a medium-sized bowl, whisk together all the ingredients for the pumpkin batter: pumpkin puree, sugar, vegetable oil, egg, and vanilla extract. In another bowl, combine the dry ingredients for the pumpkin batter: flour, baking powder, baking soda, cinnamon, nutmeg, and salt. Gradually add the dry ingredients to the wet ingredients, mixing until well combined. In a separate bowl, mix the ingredients for the chocolate batter: sugar, cocoa powder, and baking soda. Add hot water and stir until it's smooth and well combined. Add in the flour bit by bit until you have a smooth batter. To create the zebra pattern, alternate spoonfuls of the pumpkin batter and chocolate batter into the greased loaf pan. Use a knife to gently swirl the batters together to create a marbled effect. Bake in the preheated oven for about 50-60 minutes or until a toothpick inserted into the center comes out clean. Allow the loaf to cool in the pan for about 10 minutes, then transfer it to a wire rack to cool completely. Once completely cooled, frost with the cream cheese icing, if you so desire. Slice and enjoy your Chocolate Pumpkin Zebra Loaf! Recipe Card Chef's Notes Don’t over-swirl - less is more for a clear zebra pattern If the top browns too quickly, tent loosely with foil Let the loaf cool completely before frosting to avoid melting The flavors deepen beautifully the next day Storage Tips Make ahead: Bake the loaf a day in advance - it tastes even better the next day Storage: Store covered at room temperature for up to 3 days Refrigeration: Frosted loaf should be refrigerated and brought to room temp before serving Freezing: Freeze unfrosted slices for up to 2 months Recipe Card RECIPE VIDEO Newsletter SignUP
- Lemon Hibiscus Thumprint Cookies – Swiss-Inspired Recipes & Photography | Poetic Road
Your tastebuds will love these sweet buttery lemon shortbread cookies that are topped with a lightly floral and tart homemade hibiscus jam. | From Poetic Road by Christine Loertscher – Swiss-inspired recipes and photography. < Back Lemon Hibiscus Thumprint Cookies Prep Time: 15 minutes Cook Time: 15 minutes Serves: 20 cookies Oct 23, 2025 Last updated: This recipe may contain affiliate links About the Recipe I love thumbprint cookies. They’re so simple yet perfect—no fuss, just buttery goodness with a touch of jammy sweetness. If you’re into classic cookies, the kind that are effortlessly elegant (think Black and White Butter Cookies ), you’ll love these too. They have that same timeless appeal but with a pop of color and a jammy twist. I’ve made them with all kinds of store-bought jams, from strawberry to apricot and everything in between. Fill them with whatever flavors you’re craving! These particular thumbprints were made for a collaboration with Selefina Spices , and I wanted to showcase their gorgeous dried Hibiscus Flowers . I’d never used hibiscus to make a preserve before, so this was a total experiment. I usually just steep them for tea, so I wasn’t sure if the jam would come together—and I definitely didn’t expect the color to turn out so deep and dramatic! I was imagining a more transparent ruby pink, but sometimes unexpected surprises make a bake even better than planned. I love how the dark hibiscus jam pops against the bright, lemony cookies—especially with the heart-shaped imprint. A little twist on a classic, but still just as easy and satisfying. SKIP TO RECIPE CARD SKIP TO VIDEO Simple but Stunning – These cookies are incredibly easy to make but look like they took way more effort. Perfect for casual baking or impressing guests! Customizable Fillings – Whether it’s store-bought jam, homemade preserves, or something unexpected (like hibiscus!), you can easily switch up the flavors. Buttery & Soft – The delicate, melt-in-your-mouth texture pairs beautifully with the slightly sticky jam filling. A Fun Twist on a Classic – The deep, dramatic color of hibiscus jam adds an elegant contrast, making these cookies even more eye-catching. No Fancy Equipment Needed – Just a bowl, a spoon, and your thumb (or the back of a spoon for a more uniform shape). What You'll Love 1. Why did my thumbprint cookies spread too much? This can happen if your butter was too soft when mixing. Try chilling the dough for 15–20 minutes before baking to help them hold their shape. 2. Can I use any type of jam for thumbprint cookies? Absolutely! Store-bought or homemade, any jam or preserve works. Just avoid ones that are too runny, as they can spread too much while baking. 3. Can I make these ahead of time? Yes! The cookies stay fresh in an airtight container for up to 5 days. You can also freeze the unbaked dough balls and bake them fresh when needed. 4. What’s the best way to fill the thumbprint indent? You can use a small spoon or piping bag for precise filling. If using a thicker jam or preserve, slightly warm it before adding it to the cookies. 5. Can I add a glaze or topping? Definitely! A drizzle of white chocolate or a dusting of powdered sugar would be a lovely finishing touch. Frequently asked Questions Ingredints Explained Ingredients For the cookies: 1 cup unsalted butter, softened 1/2 cup granulated sugar 2 teaspoons lemon zest 2 cups all-purpose flour 1/4 teaspoon salt 1 teaspoon vanilla extract Hibiscus Jam or Preserve (see below) For the hibiscus preserve: 1 1/2 cups water 1 cup granulated sugar 2 tablespoons dried hibiscus flowers 1 tablespoon hibiscus powder 1 teaspoon lemon peel powder 1 tablespoon lemon juice NEWSLETTER SIGN-UP Preparation Begin by making your hibiscus preserve, as this will need a little bit of time to cool before adding it to your cookies. Homemade hibiscus preserve is really easy to make. Simply follow my easy steps below. Homemade Hibiscus Preserve: In a saucepan, combine the dried hibiscus petals and water. Bring to a boil, then reduce the heat to low and simmer for about 10-15 minutes until the petals are softened. Strain the liquid from the petals, pressing the petals to extract as much liquid as possible. Return the liquid to the saucepan and add sugar and lemon juice. Stir well to combine. Bring the mixture to a boil over medium-high heat, then reduce the heat to low and simmer for about 15-20 minute s or until the jam thickens to your desired consistency. Tip: to test the consistency of the jam, place a small dollop on a cold plate, let it sit and cool a few minutes. When cool run your finger through it. If the jam wrinkles up and sticks to your finger (in a jam-like consistency) you're ready to go. Remove the saucepan from the heat and let the hibiscus jam cool to room temperature. Now that your hibiscus preserve is ready, stick it in the fridge and allow it to cool as you start creating the cookies. The Cookies: Preheat your oven to 350°F (175°C) and line a baking sheet with parchment paper. In a large bowl, cream together the softened butter, sugar, and lemon zest until light and fluffy. 3. Add the vanilla extract and mix well. 4. In a separate bowl, whisk together the flour and salt. Gradually add this dry mixture to the wet ingredients, mixing until just combined. 5. Shape the cookie dough into small balls and place them on the prepared baking sheet. 6. Make an indentation in the center of each cookie using your thumb or the back of a spoon. Tip: to make these cute heart shapes I used my pinky. First press your pinky into the dough at an angle and the do another on the opposite side, with the bottom of each imprint touching. 7. Fill each indentation with hibiscus jam or preserves. 8. Bake in the preheated oven for about 12-15 minutes or until the edges are lightly golden. 9. Allow the cookies to cool on the baking sheet for a few minutes before transferring them to a wire rack to cool completely. Recipe Card Chef's Notes Storage Tips Recipe Card RECIPE VIDEO Newsletter SignUP
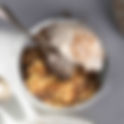
- Brown Butter Apple Crisp with Oats & Orange Zest – Swiss-Inspired Recipes & Photography | Poetic Road
This Apple Crisp is cozy and comforting, made special with nutty brown butter, bright orange zest, and the perfect balance of warm spices.| From Poetic Road by Christine Loertscher – Swiss-inspired recipes and photography. < Back Brown Butter Apple Crisp with Oats & Orange Zest Prep Time: 20 minutes Cook Time: 40 minutes Serves: 6-8 Servings Dec 15, 2025 Last updated: This recipe may contain affiliate links About the Recipe Apple Crisp has been one of my go-to desserts for years - simple, cozy, and always a favorite when apples are in season. What makes this version different from other apple crisps is the browned butter and orange zest in the topping, which give it a nutty richness and a bright little lift. I also used Selefina Spices Harvest Spice Blend as part of a commissioned collaboration, which pulls all the warm spices together in the easiest way. If you don’t have the blend on hand, I’ve included the individual spices you can use to get the same flavor. If you’re looking for more apple inspiration, you might enjoy my Baked Apples for a simple fall dessert, my Apple Marzipan Babka for something a little more show-stopping, or my Apple Cider Donuts , an apple season must! SKIP TO RECIPE CARD SKIP TO VIDEO An elevated classic : The browned butter and orange zest make this apple crisp stand out from the rest. Cozy yet effortless : Simple to throw together, but tastes like something special. Flexible and forgiving : Works with many apple varieties, or even pears if you’d like a twist. Holiday-worthy aroma : Your kitchen will smell like cinnamon, citrus, and toasted oats while it bakes. What You'll Love Q: What kind of apples should I use? A mix of firm-sweet (like Honeycrisp or Pink Lady) and firm-tart (like Granny Smith) works best for both flavor and texture. Q: Can I prep this ahead of time? Yes, you can prep the filling and topping separately, then assemble and bake just before serving. For the crispiest topping, brown the butter fresh before mixing it in. Q: Can I make it gluten-free? Yes, use certified gluten-free oats and swap the flour for a 1:1 gluten-free baking blend. Q: Can I use the spice mix substitute instead of Harvest Spice Blend? Absolutely! Just measure out the substitute spices separately for the apples and topping (you’ll need slightly different amounts for each). Q: How should I store leftovers? Cover and keep at room temperature for 1 day, refrigerate up to 4 days, or freeze for up to 3 months. Reheat in the oven for a crisp topping. Q: Can I add other fruits? Yes! Pears, cranberries, or even a pear-apple combo work beautifully with the warm spices of this recipe. Frequently asked Questions Ingredints Explained Apples – Use a mix of tart and sweet varieties (like Honeycrisp and Cortland) for balanced flavor and texture. Brown butter – Slowly melting and toasting the butter transforms it into a fragrant, nutty base that elevates the crisp far beyond the ordinary. Oats – Old-fashioned rolled oats create that perfect rustic crumble texture. Quick oats can make the topping too soft. Flour – Helps bind the crumble and gives it structure. Brown sugar – Adds depth and molasses richness that complements the brown butter’s nuttiness. Cinnamon and nutmeg – Classic warming spices that bring the apples to life. Vanilla extract – Enhances the sweetness and aroma - a small touch that makes the crisp taste bakery-worthy. Lemon juice – Balances the sweetness and keeps the apples from browning. Orange zest – The secret twist! Adds brightness and subtle citrus perfume that lifts the richness of the brown butter. Ingredients For the apple filling: 6 medium apples (about 900 g), peeled, cored, and sliced ¼-inch thick 2 tbsp lemon juice ⅓ cup (65 g) granulated sugar 2 tbsp all-purpose flour 1 ½ tsp Harvest Spice Blend or the following spice mix: 1 tsp cinnamon ¼ tsp ground cardamom ¼ tsp ground nutmeg Pinch of allspice Pinch of ground cloves Tiny pinch of white pepper (optional) For the topping: 1 cup (100 g) rolled oats ½ cup (60 g) all-purpose flour ½ cup (100 g) brown sugar, packed ½ tsp fine sea salt 1 tsp Harvest Spice Blend or the following spice mix: ¾ tsp cinnamon Pinch of cardamom Pinch of nutmeg Pinch of allspice Pinch of cloves Tiny pinch of white pepper (optional) ½ cup (113 g) unsalted butter Zest of 1 medium orange Optional: ½ cup (60 g) chopped pecans or walnuts NEWSLETTER SIGN-UP Preparation Preheat oven to 350°F (175°C). Lightly grease a 9x9-inch (23x23 cm) baking dish or similar. Prepare the filling: In a large bowl, toss apple slices with lemon juice, sugar, flour, and Harvest Spice Blend (or alternative mix of spices). Spread evenly in the baking dish. Brown the butter: Place butter in a light-colored saucepan over medium heat. Let it melt, then cook, swirling occasionally, until it turns golden brown and smells nutty (3–5 minutes). Watch closely to avoid burning. Remove from heat and stir in orange zest. Let cool slightly for 5 minutes. Make the topping: In a medium bowl, combine oats, flour, brown sugar, salt, and Harvest Spice Blend . Pour in the warm brown butter and orange zest mixture, stirring until clumps form. Stir in nuts if using. Assemble: Sprinkle the topping evenly over the apples. Note: The oat topping will not cover the apples completely and this is O.K. Apple crisp toppings often look a little sparse before baking because the apples will settle and the topping will spread out as it bakes. Once it’s golden and bubbling, that “sparse” topping turns into a deliciously crisp, crumbly layer that covers the apples perfectly. Bake: 40–45 minutes, until the topping is golden brown and the apples are bubbling. Serve: Let cool for 10 minutes before serving warm, ideally with vanilla ice cream or lightly sweetened whipped cream. Storage Tips Room Temperature: Cover loosely and keep at room temperature for up to 1 day . Refrigerator: Store covered for up to 4 days . The topping will soften, but the flavors deepen. Reheating: Warm individual servings in the microwave for 20–30 seconds, or reheat the whole dish in a 325°F (165°C) oven for 10–15 minutes to crisp the topping again. Freezing: Freeze fully baked and cooled crisp, well wrapped, for up to 3 months . Thaw overnight in the fridge and reheat before serving. Recipe Card Chef's Notes Brown butter like a pro: Melt butter over medium heat, swirling until it turns golden and smells nutty. Watch closely - it goes from perfect to burnt in seconds. Add zest at the right time: Stir orange zest into the crumble topping after browning the butter so its oils stay fresh and aromatic. Texture matters: Chill the topping briefly before baking - cold butter = crisp crumble. Serving idea: Serve warm with a scoop of vanilla bean ice cream or Greek yogurt and an extra drizzle of brown butter or maple syrup. Flavor twist: Add a splash of Calvados (apple brandy) to the filling for a grown-up dessert version. Storage Tips Room temperature: Keeps beautifully for 1 day , lightly covered. Refrigerator: Store leftovers up to 4 days in an airtight container. Freezer: Freeze baked crisp for up to 2 months . Reheat from frozen at 325°F (160°C) until warmed through and crisp on top. Re-crisp tip: To revive the topping, reheat portions in a low oven rather than microwaving. Recipe Card RECIPE VIDEO Newsletter SignUP